
PUBLICATIONS
Mota, R. C. R., 2014. High-level Authoring Tools in Augmented Reality: Analysis and Case Study. Undergraduate monograph. Federal University of Pernambuco.
Roberto, R. A., Lima, J. P., Mota, R. C., Teichrieb, V. (2016) Authoring Tools for Augmented Reality: An Analysis and Classification of Content Design Tools. In: Marcus A. (eds) Design, User Experience, and Usability: Technological Contexts. DUXU 2016. Lecture Notes in Computer Science, vol. 9748. Springer, Cham.
Mota, R. C., Roberto, R., Teichrieb, V., "Authoring Tools in Augmented Reality: An Analysis and Classification of Content Design Tools," Proceedings of IEEE International Symposium on Mixed and Augmented Reality (ISMAR), Fukuoka, Japan, 2015. [Poster]

IMAGES
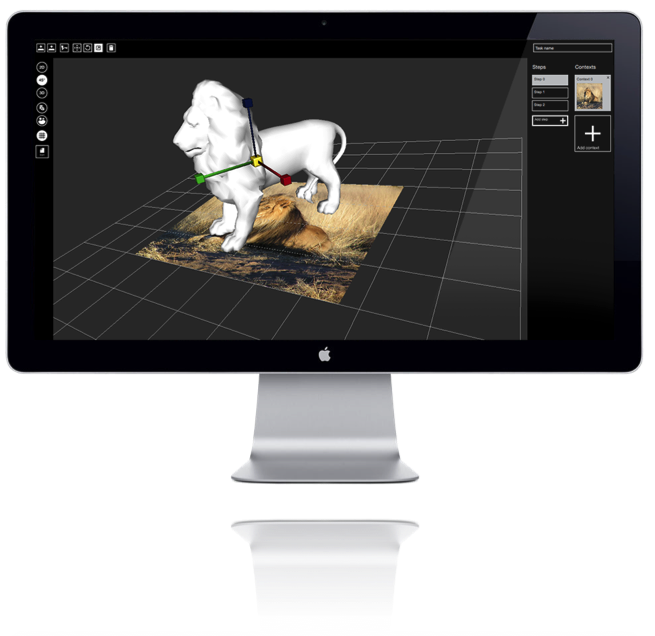
Augie Studio, a high-level content design tool through which AR instructors can be created using a graphical user interface and further executed on Augie platform.

VIDEOS
Augie Studio | High-level Authoring Tools in Augmented Reality: Analysis and Case Study
Technologies: C++, Qt, OpenGL, libQGLViewer
Type: research project
This application was developed as part of my B.Sc. research project.
The increasing advances of both hardware and software have been allowing richer experiences in augmented reality. As a result, AR has been applied in several domain areas, including advertising, oil and gas, medicine, education, robotics, entertainment, tourism, among others. Hence, there has been a gradual demand for tools that can facilitate the development of AR applications in the sense of making this technology accessible to this diverse audience. In this context, AR authoring tools comprise a wide range of software products with capabilities for composing, editing, and managing AR experiences.
Augie Studio is a high-level AR authoring tool, in which instructors can be created and further executed on Augie platform. In this sense, this high-level tool completely removes the dependency of knowing a programming language, replacing it for graphical user interface to describe the virtual content and its relationship with the real scene.
As illustrated in the image/video (left), the application interface can be divided into four areas. The first one is the AR scenario editing area on the center of the GUI. This is the graphical work area that designers use to visualize and configure the currently selected AR scene. The second area is the toolbar on the left of the GUI. It gives the designer the possibility to upload and include virtual content to the AR scenario such as three-dimensional models and two-dimensional images, set the instructor icon, or switch between 2D, 45º, and 3D view. The third area is the toolbar on top of the GUI. It provides access to additional features such as translate, rotate, scale, or delete virtual content. It also permits the designer to open/save the AR project, or export the project as data files to be read and executed on Augie platform. The fourth area, finally, is the trackables bar on the right of the GUI. This area includes two vertical lists. The one on the left displays all existing steps, and the designer creates new ones by pressing the plus button placed at the bottom of this list. By selecting one step from the left list, all its contexts are automatically displayed on the right list. In turn, each item from the right list holds a thumbnail image, which acts as a button to set the target image of the related context. Yet, in a similar manner to the left list, the designer includes new contexts by pressing the plus button at the end of the right list. In turn, a context selected from this list is automatically loaded in the AR scenario editing area.


